"Easy" Leak Fixes
- Jul 23, 2023
- 6 min read
A quick job turns into more than we expected...

Not long after acquiring our Exocet donor, I noticed oil spots appearing on the floor beneath the car. One of the reasons the Miata is so popular as an enthusiast car is that they are common, easy to work on, and thoroughly documented through shop manuals and 20+ years of forum posts. If you have a problem, so did someone else, and they documented a fix either in forum posts or on YouTube. Interestingly, one of the most common oil leaks on these cars is not documented at all in any official or unofficial shop manual that I could find - the Cam Angle Sensor (CAS) O-Ring leak.
While not documented in the official shop manual, Mazda obviously knew this was an issue as the design of the CAS was changed on 1999-2005 models. The CAS sits on the back of the engine between the cylinder head and firewall, it mates to the intake camshaft on 1.6L engine cars and the exhaust camshaft on 1.8L cars. Its purpose is to tell the Engine Control Unit (ECU) the position of the camshafts relative to the crankshaft (my guess is to change spark timing as needed). The CAS is sealed to the cylinder head by an O-ring that tends to get brittle and leak over time, this causes a significant oil leak that will ruin the heater hoses on 1.8L cars and spread oil over the transmission bell housing where it can migrate to the oil pan and tail of the transmission. With oil dripping off the oil pan and tail of the transmission, the leak may look like a Rear Main Seal (RMS), which requires dropping the transmission and removal of the clutch/flywheel, or a transmission leak which also requires removing the transmission. We needed to address the CAS leak before determining if a RMS leak or even transmission leak was occurring. If left unaddressed, an oil leak from the CAS can cause heater hose failure dumping coolant out into the engine bay or even contaminate the clutch material requiring a new clutch.
Replacing the CAS O-ring is relatively simple (in-theory) - unplug the wiring harness from the sensor, remove two bolts, pull the CAS out from behind the engine, replace the O-ring, reverse the disassembly. This 45 minute job turned into a 6+ hour bout of frustration with a lot more work than originally intended though.
CAS Removal and O-Ring Replacement

The CAS allows you to manually change the timing of a 1990-1997 Miata engine by rotating the sensor in place. One large bolt holds it in position through a slot on the sensor body that allows it to be twisted ~10-15 degrees. For this reason, you must scribe the sensor and engine so you can keep the same timing after reinstall - if you replace it in a different position, the timing of your engine will be off. Removing the sensor wasn't too difficult, the clearance between the engine block and firewall was barely enough that with one person tugging the engine to the side, the sensor could get twisted out by a second person.
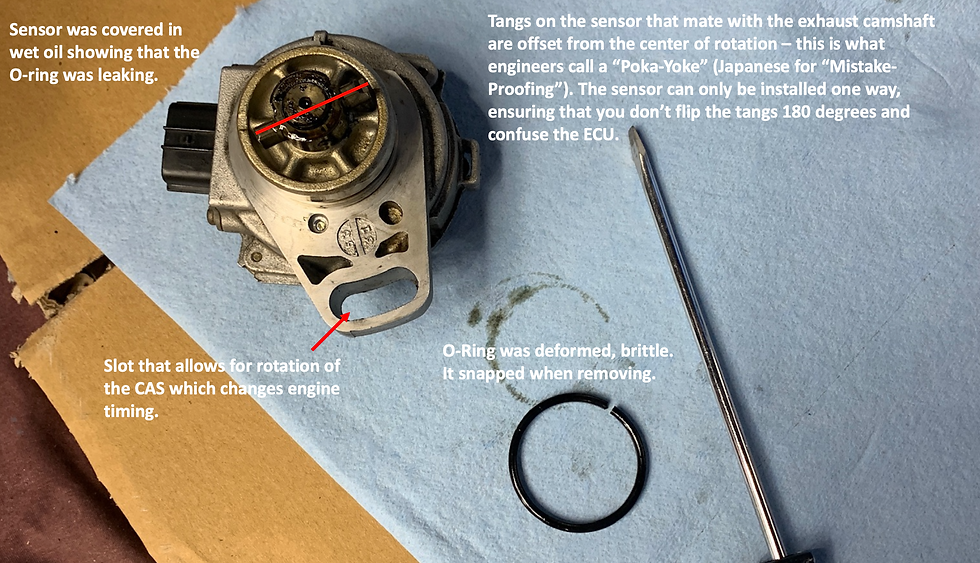
Upon removal, it was clear that the CAS O-ring had become brittle and was leaking. We pried it off with a screwdriver, being careful not to score the sealing surface, and it snapped. This used a standard O-ring which I picked up at Autozone (1-1/2" x 1-3/4" x 1/8"), reinstall of the O-ring was simple. Reinstall of the CAS, not so much.
The tangs on the sensor mate with the camshaft in the cylinder head, the sensor can only be installed one way due to them being offset from center, error-proofing the design. Unfortunately, we couldn't avoid rotating the tangs when trying to get the sensor out of the engine bay and had no idea what way they were supposed to go. It was a 50-50 shot if the tangs were oriented the correct way when we went to reinstall. The reinstallation is also completely blind - you cannot see the end of the camshaft without a mirror and you cannot tell the slot offset even with a mirror. We spent hours trying to get the tangs to align and fit back into the slot both using a mirror and sticking our fingers into the end of the camshaft to feel the mating slot. Without prior experience doing this, we were unsure what the "correct" installation was supposed to feel like so were cautious not to damage anything. We repeatedly flipped the tangs 180 degrees thinking we had the orientation wrong. At one point, we thought it was started but the CAS stopped with a small gap between the sensor and engine. With one of us laying across the top of the engine to get leverage, we still couldn't get the sensor to budge and we didn't want to break anything. The new O-ring needs to be compressed when being installed, this was causing the hangup. Turning to a local Facebook group for advice, we determined that the valve cover would have to be pulled off meaning this job just turned into a valve cover gasket replacement and reseal as well.

Replacing the Valve Cover Gasket and Resealing Things
The valve cover gasket replacement was fairly straightforward, the fear I had in removing it was that we were going to find more issues that would lead to more teardown and on and on. With the valve cover off, we would have easy access to the timing belt and camshaft seals, all points of failure with ever increasingly complex fixes that mean more preventative maintenance as you remove more items from the engine, exposing other hard-to-reach things that you may as well replace while you're in there. We weren't opposed to doing any of this maintenance - it's part of the fun of a project car - but with more than 100k miles on the engine, you don't want to find lots of surprises when opening things up. This maintenance is much harder with the car put together, we would ultimately want to do timing belts or any other maintenance with the powertrain removed from the car as part of the Exocet conversion (the reason we are doing the CAS replacement is to help determine if the RMS or transmission is leaking - if neither one is leaking, we aren't required to spend time disassembling the powertrain during the conversion process).

Fortunately, there were no surprises beneath the valve cover. The Positive Crankcase Ventilation (PCV) valve and hose from the valve cover to intake were bad but that is an easy fix we can do later (without any disassembly). It probably worked out better that we had to pull the valve cover, the CAS cover (cap) is separate from the cylinder head and valve cover meaning it needs its own sealant - we found none on ours which means it would have leaked after the O-ring fix anyways. After thorough cleaning of the valve cover and CAS cap, the cap was reinstalled with anaerobic gasket sealant for a good seal (as an aside, an O-ring sealing against a split surface is not a great sealing design). A new valve cover gasket was installed onto the cover, grey RTV was applied next to the CAS cap and both camshaft caps, and the valve cover was reinstalled.

The CAS cap sealant and torque specs were not in any of our shop manuals, we deferred to Facebook group members with experience doing this and chose Permatex anaerobic gasket maker (red) for the sealant, 17 ft-lbf of torque was applied to the cap bolts based on conventional wisdom (we did have to buy two torque wrenches to complete this job, a 3/8" drive ft-lbf model due to the low torque on the CAS bolts and a 1/4" drive inch-lbf model to torque down the valve cover bolts).
With the valve cover off, the CAS reinstall was simple and took about 30 seconds. The entire process of replacing the valve cover gasket was not complicated and we should have just done it first rather than spending hours trying to force the CAS back in.
Test Drive
After everything was reinstalled and torqued properly, the car started without hesitation. There was some smoking off the headers, likely oil residue from working under the hood, but a quick test drive revealed no issues.
Total time invested: 6-7 hours*
*About 2-3 hours of this cursing out the CAS for not wanting to reinstall and scouring forums/YouTube for solutions before breaking down and pulling the valve cover.
Comments